
I’m in shock that I officially became a mom almost a whole year ago. We’ve had 365 days of practicing, growing, and learning together and I am whole heartedly going to miss my little one’s infant stage.
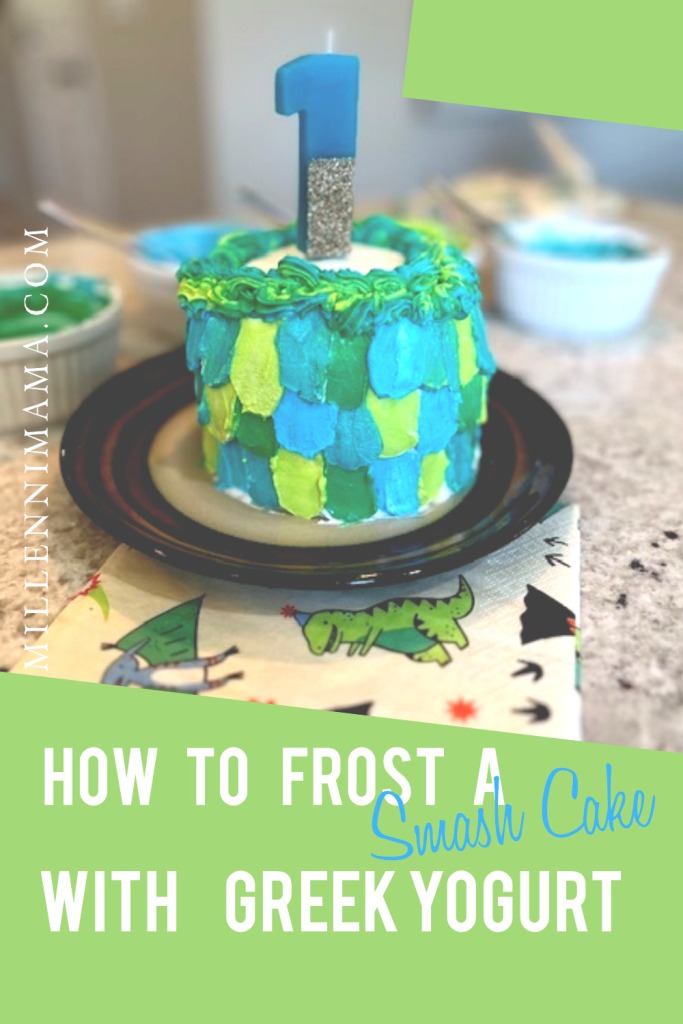
Having a fun birthday cake seems to be an important rite of passage into toddlerhood. While I am against serving added sugar before at least two years old, an exciting cake was important for his milestones and my own joy as a mom. Who doesn’t want a messy smash cake picture?! I struggled to find a healthier recipe for the cake and icing, so I’m sharing the recipes I used, Greek yogurt frosting guidance, and necessary equipment.
I made my little one a dinosaur inspired cake because our favorite book to read together has been Night Night, Dino-Snores. I tried to make the frosting look like little dinosaur scales. As someone who is, I assure you, not Martha Stuart, I am very pleased with how it turned out. It could easily be dragon themed, or just change the color scheme for unicorns, goldfish, sports, – really anything you’d like!
As an Amazon affiliate, I earn a commission on qualifying purchases. Thank you for supporting my small business.
Smash Cake Material List
- Cake Recipe – After scouring for a good recipe, I used this smash cake recipe from The Artisan Life. I ended up not having to use a blender because I had ground flax seed and flour already. It was super easy and delicious! There are lots of options out there that will meet your baby’s dietary needs, so spend some time finding the one right for you
- Greek Yogurt for Frosting – My frosting was ONLY Greek Yogurt and coloring. I highly recommend using whole fat Fage brand yogurt. It’s already extremely thick and has no added sugar. Buy a large enough container to have adequate frosting for a base layer and frosting to decorate with depending on your cake size
- Cake Pans – 4 inch cake pans are the perfect size for an individual smash cake
- Plate – This seems silly – but consider where you’re going to frost your cake. Are you going to need to transfer to highchair or transport to a family member’s house? If you haven’t planned ahead, you could be looking at a real headache to move your cake. Consider a round piece of cardboard to easily move your cake
- Food Coloring – These gel food colorings worked absolutely fantastic and were gluten, dairy, and nut free, and vegetarian. They DO have sugar listed in the ingredients, but I decided that the two drops I was using probably wouldn’t amount to much. If you prefer all natural options, try using healthy foods like beets and strawberries to color your yogurt. Just be careful not to add too much fluid to the yogurt as you may need to strain it again
- Small Cake Frosting Spatula
- Frosting Tip – I used Wilton’s 21 Star tip which you can get in this Wilton Kit
- Frosting Bag – I used Wilton’s again, but you could easily just cut a corner off of a large plastic food storage bag too
- Plastic Wrap
Smash Cake Time Frame
I baked and decorated my cake over the course of two days. This gave it enough time to cook and cool where I wouldn’t have to worry about the frosting melting off. If you absolutely have to do it in just one day, you certainly could, but try to give yourself a at least a few hours of time between baking and frosting to allow your cake to cool completely and your yogurt frosting to thicken. Here’s the general schedule I followed:
Day 1: Baking Cake and Preparing Frosting
- Bake your cakes– Once your cakes are baked, pop them out of the cake pans and put them into the fridge to cool
- Strain your Greek Yogurt – Place a strainer in a bowl, put a few paper towels over the strainer, and empty your container of yogurt right on top. Your yogurt will slowly drip out excess water into the bowl. You can do this in just a few hours if you have to, but I left mine to strain over night to make sure it was very thick. I strained the entire 32 ounces of yogurt because I wasn’t sure how much I needed and wanted to have enough to experiment. If you’re frosting two 4-inch cakes, this should be more than enough
Day 2: Frosting The Smash Cake
- Trim and level your cakes. Your cakes most likely have a dome on top from baking. Carefully trim the dome off of the cake to level them. They should now be flat on the top and bottom and ready for frosting. Pro Mama Tip: Leave time for snacking on the trimmings here with your little one.
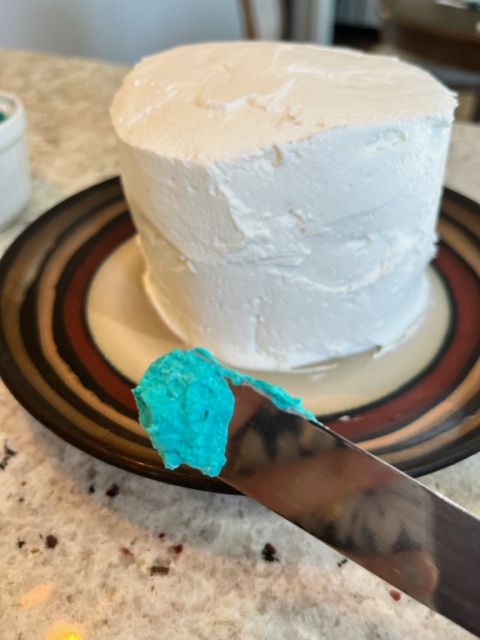
- Put one cake down on your plate. Using your small frosting spatula, scoop some of the strained yogurt onto the cake bottom and spread evenly. Once complete, place the second layer on top.

3. Using the frosting spatula, begin putting on the base frosting layer. Take your time to even out the frosting and scrape with the back of the spatula to flatten it. Fill in wholes with a dollop of frosting and scrape as needed.
Repeat until you are happy with the results, gently clean any frosting from your plate with a paper towel, and then throw the cake into the fridge for at least 10 minutes. This allows what you’ve done so far to set and prepare for the fun frosting part!


4. Prepare decorative frosting. I separated mine into a few small cups and mixed my desired colors. If you’re using the concentrated coloring, start slowly with just a drop or two and add more if you need to – a little goes a long way!
Ramekins were perfect to mix my frosting, but any small bowl will do just fine. I made four small batches of decorative icing using the gel food colors:
- Blue
- Turqoise
- Bright Green
- One where I put a drop of all three food colors, which ended up looking like a playdough green (see the top right Ramekin)

5. Take your cake out of the fridge and begin frosting with the decorative frosting. Take a small dollop of one of the colors on the flat back part of your frosting spatula. Put the frosting filled part of your spatula at the bottom of your cake and swipe upwards. Wipe your spatula clean on a paper towel and then repeat with other colors. It’s important to completely clean the spatula or your colors may mix and become brown at some point.


6. Complete the first row and then move up a row. You can now keep the same color on your spatula and do several dots before switching since you now have the spacing based on the bottom row. This can save you from wasting time and frosting when you wipe it off. Repeat for as many rows as your cake needs.


7. Prepare frosting for piping. Take a large piece of plastic wrap and lay it on a flat surface. Spoon 5-7 rows of your icing onto the plastic wrap, alternating between colors. Roll the plastic sheet up onto itself and spin the edges shut like a small hot dog.


8. Prepare your piping bag. Snip the corner of your piping bag (not too far- you can always cut more!) and then slip your piping tip into the hole. Cut off one side of your frosting hot dog bag you made in step 8. Slide the cut side down into the frosting bag into the tip. It’s now ready to push the frosting through the tip and pipe.
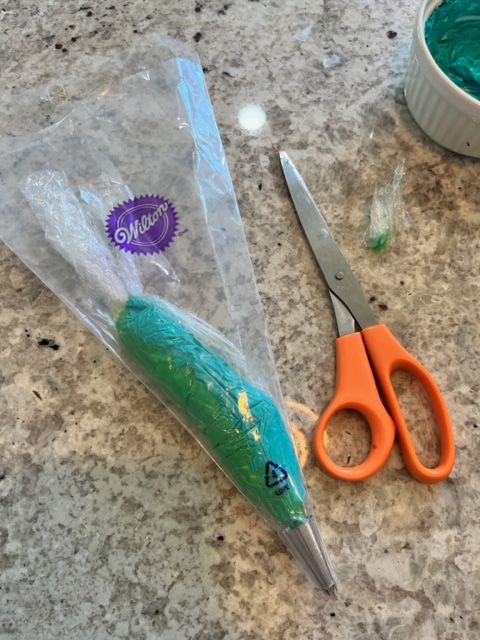
10. Pipe your frosting onto your cake. I love these easy piping directions from Wilton. I did not, but I do recommend practicing before going to town. I improved as I was going, and I think it could have turned out a lot better had I practiced a bit. Pro Mama Tip: I found at times my plastic wrap frosting bag slid down and blocked the tip. Try pulling it back up in your piping bag periodically to avoid this.
An voila! A beautiful smash cake frosted with only Greek yogurt.

Is Frosting with Greek Yogurt like Normal Frosting?
When strained properly, Greek yogurt acts very similarly to regular frosting. It can be spread and pipped out very comparably to make beautiful designs. Be sure to refrigerate the frosted cake after it is prepared and keep refrigerated until serving.
Final Thoughts
I am fully expecting my little one to literally take one bite of this cake, but I am so glad I took the time to make something special just for him. We’re halfway to my goal of no added sugar before two years and this cake is keeping us moving forward. Ultimately, the Greek yogurt frosting was a huge win for both health goals and having a blast decorating.
You got this, Mama. Share your cake creations in the comments. I would love to see them. And – oh yeah – happy Mama anniversary to you!
